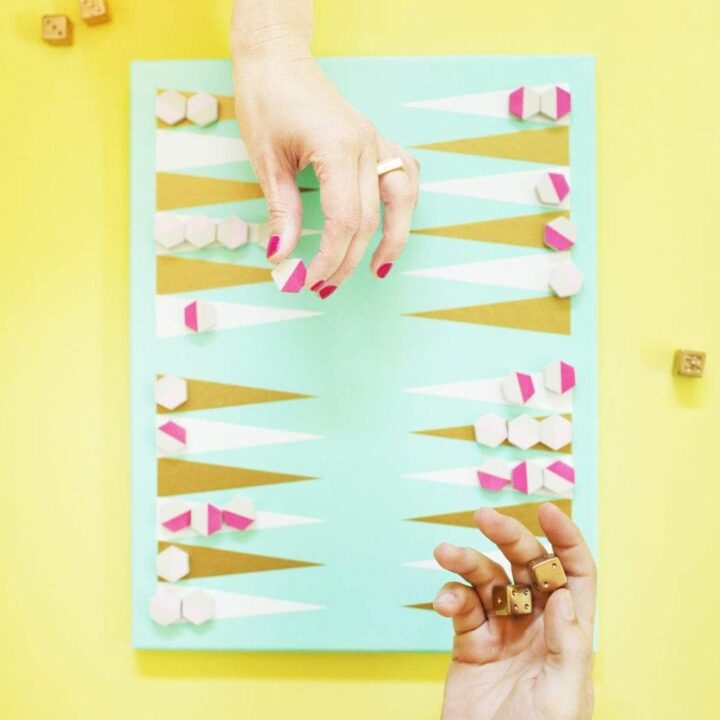
DIY Backgammon Board Game
Create a DIY Backgammon board game that is fun to play and looks beautiful on a coffee table!


When I was looking around for materials to put together a DIY backgammon game, I couldn’t quite figure out what I wanted to use.
We toyed with the idea of building it out of wood, or chipboard, or doing another leather roll-up game.
But then my eyes fell on a bunch of blank canvases in my office and my brain was like ding! What if we make a game that doubles as art for your walls?! So we did. DIY backgammon game… art.
Psst — before you dive into the tutorial, be sure to sign up below for my VIP group. I send these folks my very best DIYs, projects, and ideas.

Supplies You’ll Need
Materials
- 11″ x 14″ canvas
- gold adhesive vinyl
- white adhesive vinyl
- craft paint in three colors
- paintbrush
- small hexagon ice cube tray
- cement
- mixing cup
- popsicle stick
- washi tape
- scissors
- four dice and a backgammon doubling cube (found mine on eBay for a dollar!)
- gold spray paint – this is my fave!

How to Make a DIY Backgammon Board
Make Time: 2 Hours (Plus Drying Time)
- Paint your entire canvas in a bold, fun color. Set aside and allow it to dry.
- While your canvas is drying, cut your backgammon points out of vinyl. The triangles for the points should have a base that’s one inch across and should be four inches tall. You’ll need 12 gold and 12 white.
- In a well-ventilated area, spray paint your dice and doubling cube. Allow the top and sides to dry thoroughly before flipping them over to paint the bottom.
- Once the canvas is dry, add a border of washi tape around all four edges, placing the tape flush with the edges of the canvas. Starting at one corner, add your points to the board. With the canvas placed vertically, place your first point in the lower left corner. Align the base with the edge of the washi tape. Place six points, alternating colors. Repeat the process, starting at each corner, so there is a space between the points in the center of the board. Be sure you’re alternating colors correctly!

How to Make Game Pieces for Backgammon
- To make the game pieces, follow the same instructions from our DIY checkers tutorial, cutting all measurements in half. This includes the amount you pour into each well of the ice cube tray — be sure to only use a half teaspoon to create each piece.
- Allow to dry and paint them in the same manner as the checkers. You’ll need 30 game pieces total.


How to Play Backgammon
The end! I confess: I had no idea how to play backgammon when I decided to make the game, but it’s been so fun to start learning.
If you need instructions, here’s how to play backgammon.
And once you’re done playing, lean your game board up against the wall on a shelf or on the mantel to create some cool art. Have fun! xoxo

P.S. See all of our past game night DIYs right here! This one is particularly hilarious if you love Los Angeles.
DIY Backgammon Game
Create a DIY Backgammon board game that is fun to play and looks beautiful on a coffee table!
Materials
- 11" x 14" canvas
- gold adhesive vinyl
- white adhesive vinyl
- craft paint in three colors
- small hexagon ice cube tray
- cement
- mixing cup
- four dice and a backgammon doubling cube (found mine on eBay for a dollar!)
- washi tape
- gold spray paint
Tools
- paintbrush
- popsicle stick
- scissors
Instructions
- Paint your entire canvas in a bold, fun color. Set aside and allow it to dry.
- While your canvas is drying, cut your backgammon points out of vinyl. The triangles for the points should have a base that's one inch across and should be four inches tall. You'll need 12 gold and 12 white.
- In a well-ventilated area, spray paint your dice and doubling cube. Allow the top and sides to dry thoroughly before flipping them over to paint the bottom.
- Once the canvas is dry, add a border of washi tape around all four edges, placing the tape flush with the edges of the canvas. Starting at one corner, add your points to the board. With the canvas placed vertically, place your first point in the lower left corner. Align the base with the edge of the washi tape. Place six points, alternating colors. Repeat the process, starting at each corner, so there is a space between the points in the center of the board. Be sure you're alternating colors correctly!
- To make the game pieces, follow the same instructions from our DIY checkers tutorial, cutting all measurements in half. This includes the amount you pour into each well of the ice cube tray -- be sure to only use a half teaspoon to create each piece. Allow to dry and paint them in the same manner as the checkers. You'll need 30 game pieces total.
Notes
The end! I confess: I had no idea how to play backgammon when I decided to make the game, but it's been so fun to start learning.
If you need instructions, here's how to play backgammon.
And once you're done playing, lean your game board up against the wall on a shelf or on the mantel to create some cool art. Have fun! xoxo
Tutorial photos by Lovely Indeed. All other photos by Scot Woodman.

what an awesome idea! No storage necessary, I love it. My grandma went to turkey when I was younger and she came back with a board and all she wanted to do was play backgammon. I still love the game and think I might need this on my wall.
I seriously LOVE everything about this! I don’t think I could pull it off though since I’m not very good with really detailed art projects haha. I do however, collect backgammon boards so this is amazing!
XO
Sayeh, The Office Stylist
Nice DIY! Thanks for sharing! 🙂
What a great idea! Beautiful!
I’ve been wanting to learn how to play backgammon for awhile now, and this DIY might finally provide the motivation I need! I love that this doubles as pretty art–great idea!
xx Hannah // TheCheapishly.com
Hope so Hannah! Send photos if you end up trying it out!
All of these colours are heavenly to me! I’ve never learned how to play backgammon but if I could buy a board like that then I definitely would. The little cement pieces are a great idea! I might get some moulds and make little magnets like that for my white board. What an excellent project!
hello,
how can i order one?
very cool!